🕸️
VB .NET WinForms
WebView2: A Complete Guide
💻Overview
Integrating WebView2 into your VB.NET WinForms application allows you to embed modern web content seamlessly using Microsoft Edge (Chromium). This guide walks you through prerequisites, setup, coding, deployment, and troubleshooting — everything you need to get started.
🍪Prerequisites
Before you begin, make sure your system meets these requirements:
- Operating System: Windows 10 (64-bit) or later
- Visual Studio: Version 2017 or newer
- WebView2 Runtime: Install WebView2 Runtime or use Microsoft Edge (Canary, Dev, Beta)
🪟Setting Up WebView2 in Visual Studio
1. Create a New Project
Open Visual Studio and create a new Windows Forms App (.NET Framework). Make sure you target .NET Framework 4.6.1 or higher.
2. Install WebView2 via NuGet
Open the Package Manager Console and run the following command:
Install-Package Microsoft.Web.WebView2 -Version 1.0.864.353. Design the Form
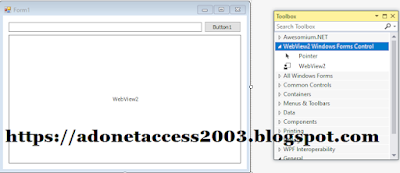
Add a TextBox, Button, and WebView2 control to your form. Rename the WebView2 control to: WebViewTest
👩💻Sample Code: Navigate to URL
This code lets users navigate to a website using WebView2:
Public Class Form1
    Private Sub Button1_Click(sender As Object, e As EventArgs) Handles Button1.Click
        If (Not IsNothing(WebViewTest) AndAlso Not (WebViewTest.CoreWebView2) Is Nothing) Then
            WebViewTest.CoreWebView2.Navigate("https://" & TextBox1.Text)
        End If
    End Sub

    Private Sub Form1_Load(sender As Object, e As EventArgs) Handles MyBase.Load
        With WebViewTest
            .Source = New Uri("about:blank")
        End With
    End Sub
End Class
🖨️Testing the Browser
Type a URL (e.g. adonetaccess2003.blogspot.com) into the textbox and click the button to navigate using WebView2.
💻Creating a Setup Project
1. Build Configuration
Set the target CPU to x86. Build the app and verify dependencies.
2. Create a Setup Project
Go to File > New > Project → Choose Setup Project. Add the Primary Output of your WinForms project and include all necessary DLLs.
3. Build & Install
Build your installer and run it with administrative privileges.
😵💫Troubleshooting Tips
WebView2 Control Not Showing
- Ensure WebView2 Runtime is installed on the target machine
- Include
WebView2Loader.dllin your installer
🧭Navigation Issues
- Check that your URL includes
https:// - Ensure
CoreWebView2is fully initialized before calling.Navigate()
🪟WebView2 vs. Internet Explorer WebBrowser Control
Feature | WebView2 | WebBrowser (IE) |
|---|---|---|
| Engine | Chromium (Edge) | Trident (IE) |
| Modern Web Standards | ✅ Full Support | ❌ Limited/Obsolete |
| JavaScript & CSS Support | Up-to-date | Outdated |
| Performance | High | Low |
| Future Updates | Microsoft Supported | Deprecated |
💽Advanced Tip: Execute JavaScript from VB.NET
WebView2 lets you run JavaScript from your VB.NET code using ExecuteScriptAsync. Here's an example:
Private Async Sub RunJS_Click(sender As Object, e As EventArgs) Handles RunJS.Click
    Dim result As String = Await WebViewTest.ExecuteScriptAsync("document.title")
    MessageBox.Show("Page Title: " & result)
End Sub
⁉️Frequently Asked Questions (FAQs)
Q: Can I use WebView2 offline?
A: Yes. You can use local HTML files or bundled resources. Set Source to a file:// URI.
Q: Is WebView2 supported on Windows 7?
A: Microsoft has ended support for Windows 7. WebView2 requires Windows 10 or newer.
Q: Do I need to install Edge separately?
A: No. Just install the WebView2 Runtime. End users don't need Edge installed.
💥Full code example project 'List files and folders in gdrive' - VB NET WebView2 Google Drive Api
♥ Here are some online Visual Basic lessons and courses:


No comments:
Post a Comment